SQL Server Installation Guide
We are learn in this “How to install SQL Server 2012
Express”.
Before Installation, you got knowledge about the
requirements of SQL Server 2012. You read http://dbsguide.blogspot.com/2016/02/sql-server-2012-introduction.html.
Further I explain few important part in installation. These are
1.
Setup Support Roles.
2.
Named Instance.
3.
Database Engine Configuration:
These Components
Configure carefully and must read in this instructions.
First you need “SQL
Server 2012 Express” Setup, so
simple you go on blew link and download
this.
https://www.microsoft.com/en-pk/download/details.aspx?id=29062
https://www.microsoft.com/en-pk/download/details.aspx?id=29062
Double click the Setup file like “SQLFULL_x86_ENU_Install.exe”, it will extract the required files for installation in the“SQLFULL_x86_ENU” folder as shown below:

Click
the Setup file “SQLFULL_x86_ENU” folder
and double click “SETUP” application.

Then start setup and you look this window.

If you see “SQL
Server Installation” center on screen, it means that your system
configuration is perfect for installation.
Then show this screen.

Click
“Installation” from the Left Panel
and Click on “New SQL Server stand-alone
installation or add fratures to an existing installation” from the Right
Showing Panel.

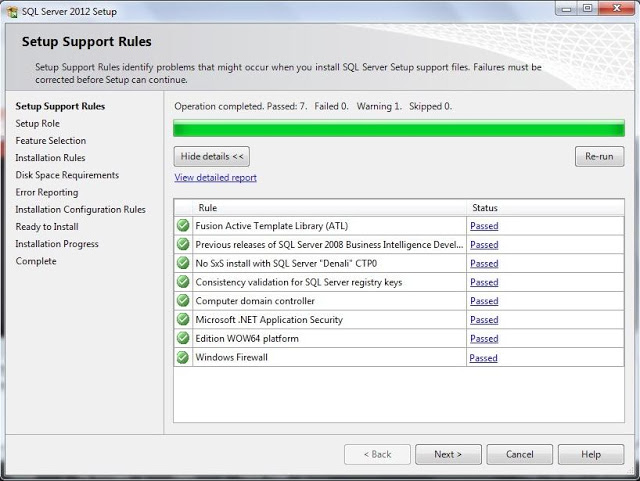
- Setup Support Rules:
Few setups for this configuration. Clear one thing must that,
setup Support Rules run two different times. So please carefully complete these
setups.
First in the “Setup
Support Rules” Click “OK“ button
when you have failed 0. Otherwise fix the issue and click “Re-run” button.

Press on “OK” button.

Select “I accept the license terms” option and click on “Next” button.

I have installed in “Offline”
mode, So I got the above error message otherwise, it does windows update
automatically and will continue the process. Simple, not take tension.
Press “Next”
button.
Press “Install” button and wait for files installation.
Now, Second “Setup
Support Rules” screen show. On this setup mostly “Microsoft .Net” and “Windows
Firewall” are failed, So fix this and “Re-run”
Press
“Next” button, when all status are
passed. Otherwise fix the issue and press “Next”
button.

Choose “SQL Server
Feature Installation”, if you do install simple SQL installation then Click
on “Next” button.
Select the all features and if you want then
change the “Shared feature directory”,
So You sure must, this 0 count failed on screen then press “Next” button.
2. Named
Instance.
“Named Instance” is
second main configuration part because Instance name like as your “Computer name”. if you want to access another
system or another version of SQL Server then we use Instance name for login
Database system. So remember you instance name.
Note: If you need more than one different version of SQL Servers
then change your instance name, otherwise you face some different issue.

Set “Instance Named”
and Click on “Next” button.

It will
not allow, if you do not have sufficient space in the disc. Press on “Next”
button.

Change the “Collation” if
you want, otherwise Press “Next” button.
3. Database Engine Configuration:
Choose the authentication mode and specify the “Administrator” user.
Here, I have selected “Add Current User”. Also, you can change the “Data
Directories” and enable “FILESTREAM”.

Press “Next”
button.

You
can change the Analysis Services “Server
Mode” and “Administrator” user.
Here, I have selected “Add Current
User”. Also change the “Data
Directories” if you want , otherwise Press “Next” button.
Note : You can select only one server mode to use: “Multidimensional and Data Mining Mode” or “Tabular Mode”. If you want both, you need to run the setup again after the first instance setup. Refer Books online.
Note : You can select only one server mode to use: “Multidimensional and Data Mining Mode” or “Tabular Mode”. If you want both, you need to run the setup again after the first instance setup. Refer Books online.

Here,
you need to choose “Reporting
Services Native Mode” and press “Next” button.

“Distributed Replay Controller” service
feature is new in SQL Server 2012, here specify the user who should have
permission to use this service. Press “Next” button.

Specify
the Controller Machine name which should have “Distributed Replay Controller” service. Also you can change
the working directory and Press “Next” button.

Press “Next” button, if failed count is
0.

Here,
you can find the list of "SQL
Server 2012" features which will be installed. If you would have
missed to enable any features, click “Back” button
and enable. Otherwise press “Install” button
to proceed.

You
can see installation progress. Press “Cancel” button,
if you want to stop the installation.

After
the successful installation, your screen should look like below :

Wow, you have successfully installed SQL
Server 2012 and to confirm the successful of installation from the screen,
you can find the “Succeeded” for all the features and refer summary
log file for further info.
Press “Close” button.
Press “Close” button.
Congratulation your installation is Completed.
No comments:
Post a Comment